- GD&T
GENERAL DIMENSIONING- International Paper Size Standards
- Technical Drawing Styles
- ISO And ANSI Projections
- ANSI Technical Drawing Views
- Technical Drawing Dimesioning Types
- ANSI and ISO Geometric Tolerancing Symbols
- Geometric Tolerancing Reading
- Taylor Principle Rule#1
- Form Tolerances
- Profile Tolerances
- Orientation Tolerances
- Location Tolerances
- Runout Tolerances
- TOLERANCES
ANSI AND ISO- Tolerancing and Engineering Standards
- Hole and Shaft Basis Limits And Fits
- ISO International System For Limits And Fits
- International Tolerance Grade (IT)
- Fundamental Deviations For Hole and Shaft Basis
- ISO Tolerance Band IT01-IT16
- Calculation Of International Tolerance
- Calculation of Upper and Lower Deviation For Shaft
- Calculation of Upper and Lower Deviation For Holes
- ISO Shaft Tolerances (3mm-400mm)
- ISO Shaft Tolerances (400mm-3150mm)
- ISO Hole Tolerances (3mm-400mm)
- ISO Hole Tolerances (400mm-3150mm)
- ANSI Standard Limits and Fits
- METAL CUTTING TECHNOLOGIES
- Terms and Definitions of the Cutting Tools
- Cutting Tool Materials
- Selection of Carbide to machine the work-part
- Identification System For Indexable Inserts
- Work-Part Materials
- Machinability and the specific cutting force
- Machinability of the Certain Material Evaluations
- Cutting Forces and Chip Formations
Concentricity:
Concentricity tolerance zone controls the median points of a feature of size. Concentricity tolerance is a condition in which the axes of all cross-section elements of a feature’s surface of revolution are common to the axis of a datum feature. A concentricity tolerance specifies a cylindrical tolerance zone whose axis coincides with a datum axis and within which all cross-sectional axes of the feature being controlled must lie. The tolerance zone is equally disposed about the datum axis for concentricity. The Concentricity requires that the median points of the controlled feature, regardless of its size, to be within the tolerance zone.

RUNOUT TOLERANCES
Runout tolerances can be state by two tolerance zone. These are circular or total runout. Runout tolerances are three-dimensional and apply only to cylindrical parts, especially parts that rotate. A part must be rotated to inspect runout. A calibrated instrument is placed against the surface of the rotating part to detect the highest and lowest points. Both circular and total runout reference a cylindrical feature to a center datum-axis. The material condition applied to the feature being controlled and the datum feature or features is always RFS because 360 degree rotation is required to conduct the inspection. Circular run out controls the cumulative variation of circularity (roundness) and coaxiality for features constructed around a datum axis and circular elements of a surface constructed an angle not parallel to the datum axis. Total run out controls the entire surface simultaneously hence it controls cumulative variations in circularity, coaxiality, straightness, taper, angularity, and profile of a surface.
Circular Runout:
Circular Runout zone is limited in the measuring plane perpendicular to the axis by two concentric circles, the common centre of which lies on the datum axis. Also it is can be defined as two-dimensional geometric tolerance that controls the form, orientation, and location of multiple cross sections of a cylindrical part as it rotates. For circular runout, the tolerance zone for each circular element on a surface constructed at right angle to the datum axis. The circular element through a surface point conforms to the circular runout tolerance for a given mating surface if all points of the circular element lie down within some circular runout tolerance zone. Circular run out controls the cumulative variation of circularity (roundness) and coaxiality for features constructed around a datum axis and circular elements of a surface constructed an angle not parallel to the datum axis. A circular runout tolerance. The tolerance zone is an annular surface of revolution about the center axis of the circle and perpendicular to the feature surface. FIM means, Full Indicator Movement.

At shown measuring position, each circular element of the shown surfaces must be within the specified runout tolerance which is 0.003 full indicator movement. when the part is rotated 360 degree about the datum axis with the indicator fixed in a position normal to the true geometric shape. The indicated surfaces must be within specified tolerance limit.
Total Runout:
Total runout involves tolerance control along the entire length of, and between, two imaginary cylinders, not just at cross sections. Total run out controls the entire surface simultaneously hence it controls cumulative variations in circularity, coaxiality, straightness, taper, angularity, and profile of a surface. Total runout tolerance for a surface constructed at right angles to the datum axis specifies that all points of the surface must lie in a zone bounded by two parallel plains perpendicular to the datum axis. And it is separated by specified tolerance. A total runout tolerance. The tolerance zone is an annular cylindrical volume of revolution about the center axis of the circle and concentric with the feature surface.
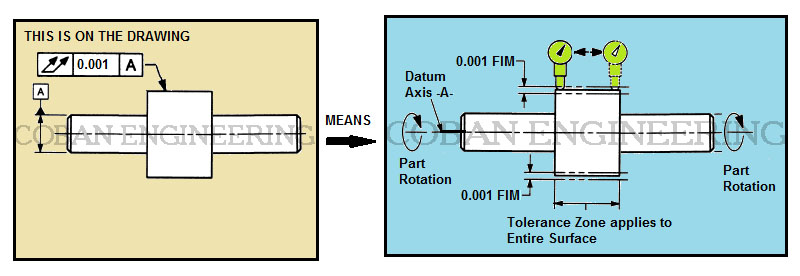
The specified entire surface of the part must lie within specified runout tolerance zone which is 0.001 full indicator movement. When the part is rotated 360 degree about the datum axis with the indicator placed at all the location along the specified in a position normal to the true geometric shape without resetting of the indicator. The feature must be within specified tolerance limit.
Free State:
Free state variation is a term used to describe distortion of a part after removal of forces applied during manufacture. This distortion is principally due to weight and flexibility of the part and the release of internal stresses resulting from fabrication. This kind of part with a thin wall in proportion to its diameter is referred to as non-rigid part. In some cases, it may be required that the part meet its tolerance requirements while in the free state. In other, it may be nectar to simulate the mating part interface in order to verify individual or related feature tolerances this is done by restraining the appropriate features. The restraining forces are those that would be exerted in the assembly or functioning of the part. However, if the dimensions or tolerances are met in the free state, it is usually not necessary to restrain the part unless the effect of the subsequence restraining forces on the concerned features could cause other features of the part to exceed specified limits.
Bonus Tolerance:
Copyright ©2010-2023 Coban Engineering.All Rights Reserved.


